Transform your structured information in an instant by applying Views to them. Currently you can choose from Outline, Table, Cards, List, Calendar, Side menu and Tabs.
Views = Different ways to arrange and visualize your information.
Switching between views is like toggling the same data between a Microsoft Word to Excel document: Changing views happens in a snap, and is effortless. Changing views doesn't undo the settings from the previous state; you can have several saved view states on the same set of information.
Views replace the traditional document: Tana stores your information in an outline form—a document-agnostic way—that allows you to add views whenever you want and wherever you need it at the moment.
Outline, Table, and Cards views let you directly edit and manipulate nodes in place. Navigation views (List, Calendar, Side menu, Tabs) provide structured ways to browse and navigate the information in your workspace.
Views work on nodes with children: This means they also work on Live searches, as well as Fields.
Add a view to any plain node: Go to the node options (ellipsis button) and turn on "Show view toolbar". This will visualize its child nodes in the selected view, and show the different view options available for that view.
Available views include:
Outline, Table, Cards
Navigation views: List, Calendar, Side menu and Tabs
Granular control of what you see: Customize your views through view options like Filter, Sort, Group and Display. These options give you a lot of control over what you see, and how you see it. Bonus: for long lists, use pagination (see Page size) to limit how many results you see at the time.
The table view shows child nodes as rows and their fields as columns.
Add child nodes using the empty placeholder row at the bottom of the table, or add in-between rows using Enter at the end of any node on the left-most column like you're adding a node underneath it.
Adding a column to a table adds a field to the node. If the table is showing results based on a supertag search, Tana will suggest incorporating the new field into the supertag definition.
You can move columns around by:
Using the keyboard shortcut Cmd/Ctrl+Shift+Arrow Up to move to the left; Arrow Down to move to the right
Right-click the field header and choose Move column left/right
Column calculations
Calculations are allowed in columns with numeric field type. Turn on by right-clicking on the field and choosing one of the options in the Calculation menu. When turned on, calculations show up on the bottom row. Filtering values will change the calculated value.
Choose between the following calculations:
Sum: Adds all values up.
Average: Adds all values and divides by count.
Median: Sorts values and displays the value of the one that appears in the middle
Min: Shows the smallest value in the list
Max: Shows the largest value in the list
Count all: Counts all rows and returns this value
Count values: Counts all rows with numbers in them and returns this value
Count unique: Counts number of unique numbers and returns this value
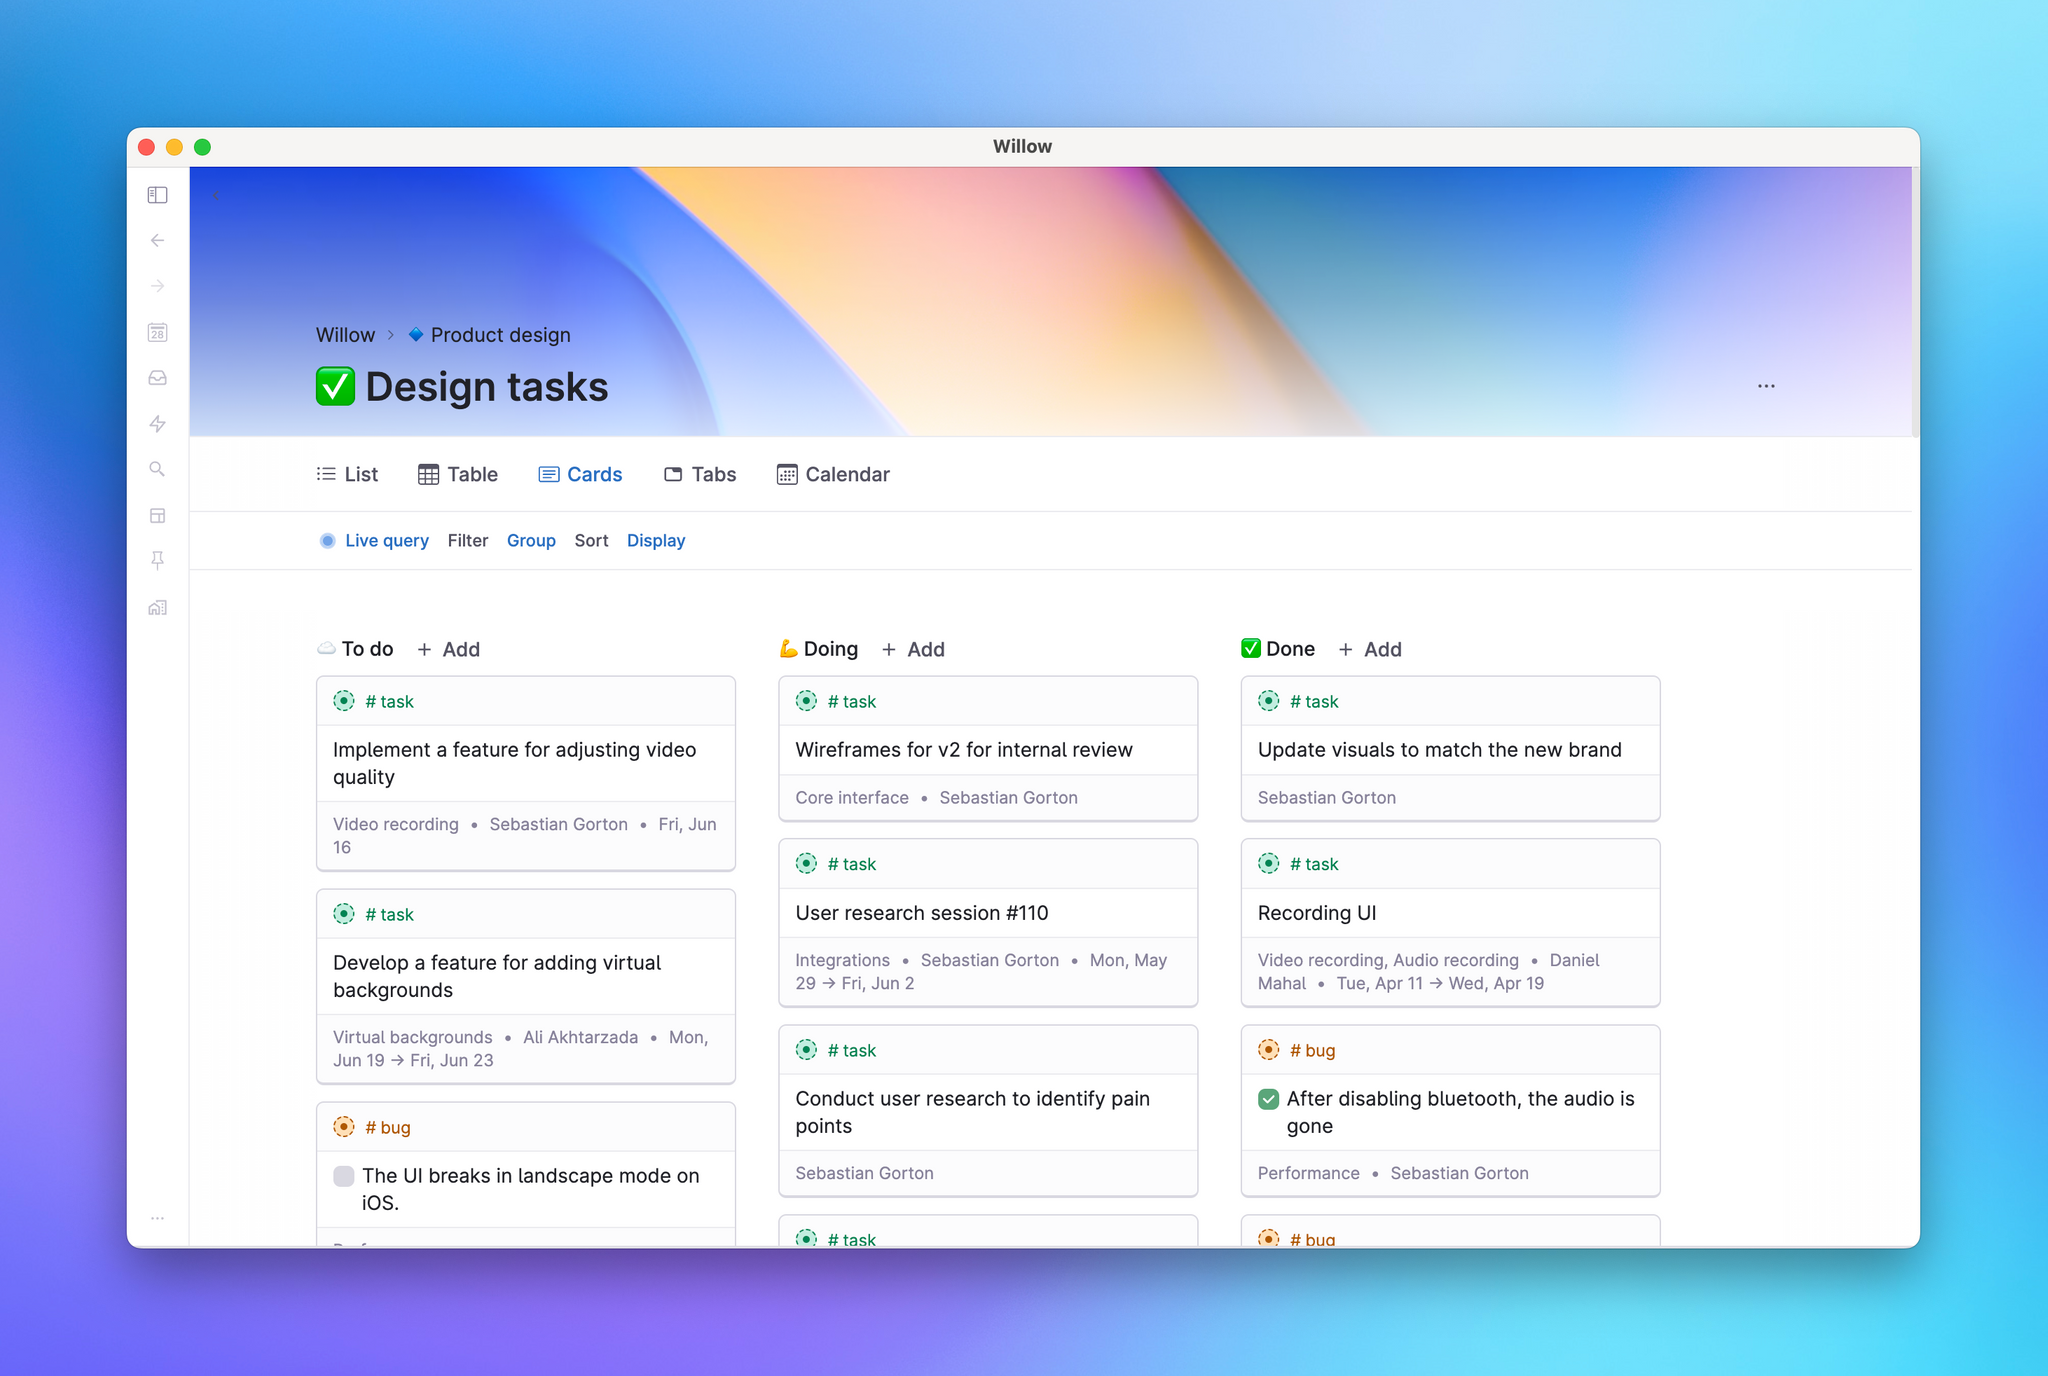
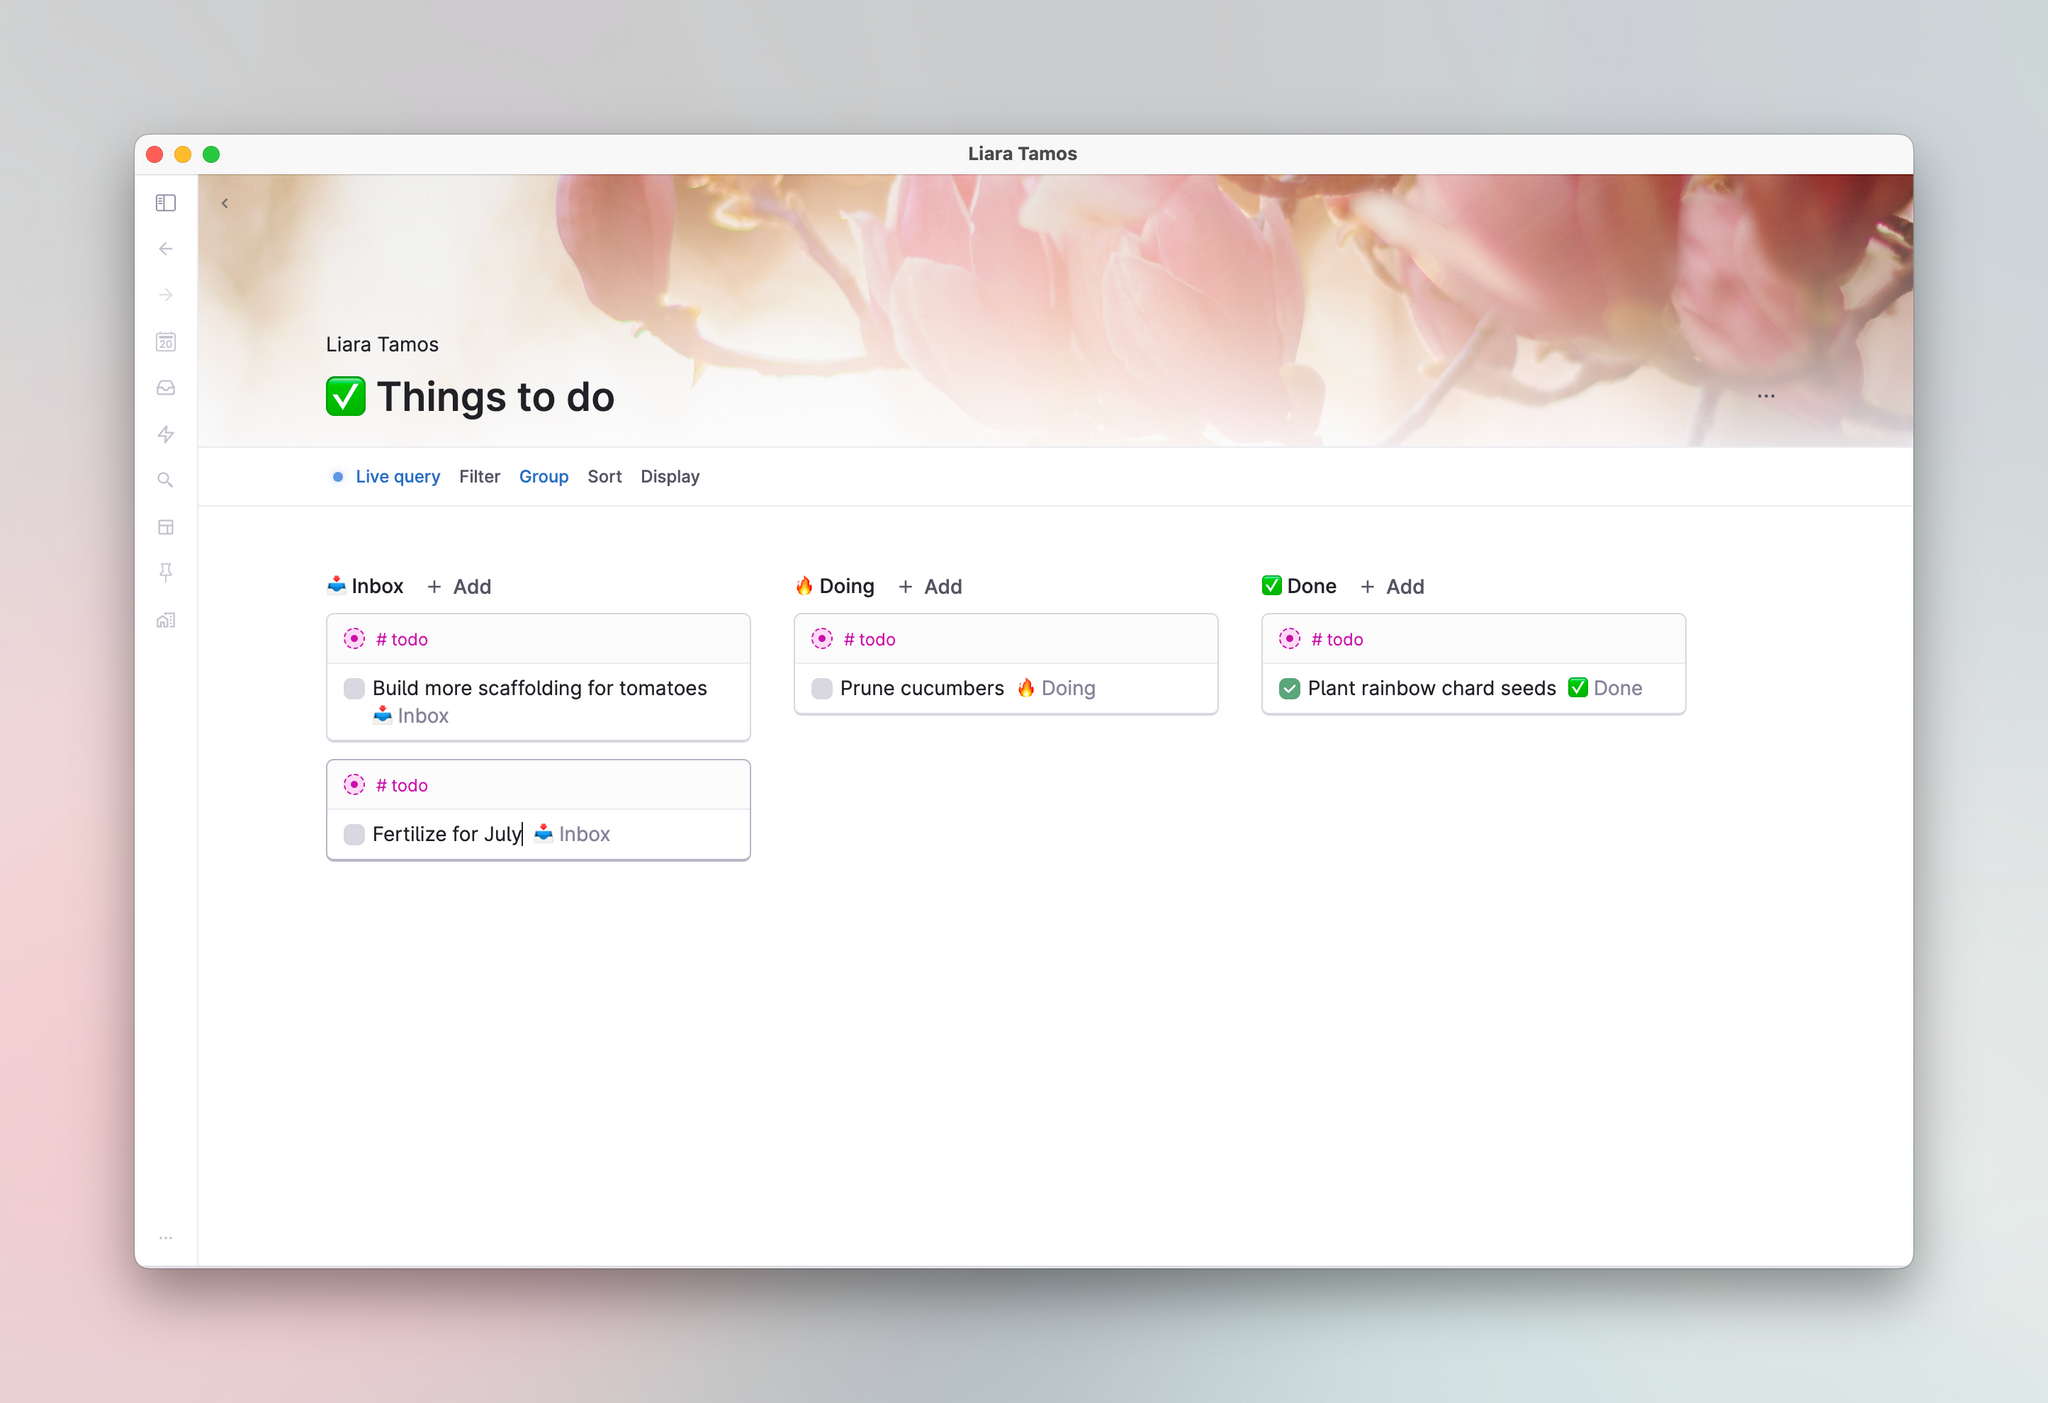
Group by a field that contains data like Status, Dates, or Categories will arrange the cards in grouped columns, and you can drag cards between columns to change their Status, Date, or Category.
Use Display to choose which fields are always shown on the bottom of the card. If a field contains an image, the image will fill the bottom of the card.
List view is a navigation view that displays content in two linked panels. The left panel shows a list of items, and clicking any item displays its full content in the right panel.
This view works on any node or search node, making it ideal for building app-like navigation, browsing categories, exploring wikis, or creating dashboards where you want to browse through items while viewing their full content side-by-side.
Create new child nodes using the + button at the top.
The Calendar view shows nodes in one of three different time granularities: day, week and month.
It looks for a date field in each child node and plots it in the month/week/day view.
Add child nodes by clicking in the calendar and creating a new entry.
Flip between month/week/day by using the navigation arrows on the top right of the view. The calendar symbol in the middle takes you to Today's date.
Child nodes without date information are set aside in a list called "[number of] nodes with no date >" at the bottom left of the calendar view. You can drag-n-drop these nodes into the calendar and this will add a date to an existing date field, or add a system date field if none other date field exists.
Child nodes with two or more date fields will show in the calendar twice. You can control which dates to use in the "Date fields" view option.
View options allow you to customize how you see and organize your information using Filter, Sort, Group, and Display. You can access view options in the node menu on all nodes and through the view toolbar.
The view toolbar is a horizontal bar that shows right under your node, displaying all view options available for the view. It provides quick access to filter, sort, group and display menus. View option buttons show turn blue when an option is applied. The view toolbar is hidden by default, but can always be shown and hidden through:
Click node option ⋯ or right-click -> Show/Hide view toolbar
Command line: Cmd/Ctrl+K > Show/Hide view toolbar
This will bring up the View toolbar under the node. The view options apply to the child nodes, and the parent node becomes the "frame" that contains this view.
You can also add specific view options directly from keyboard. Open the command line (Cmd/Ctrl+K) and use these commands:
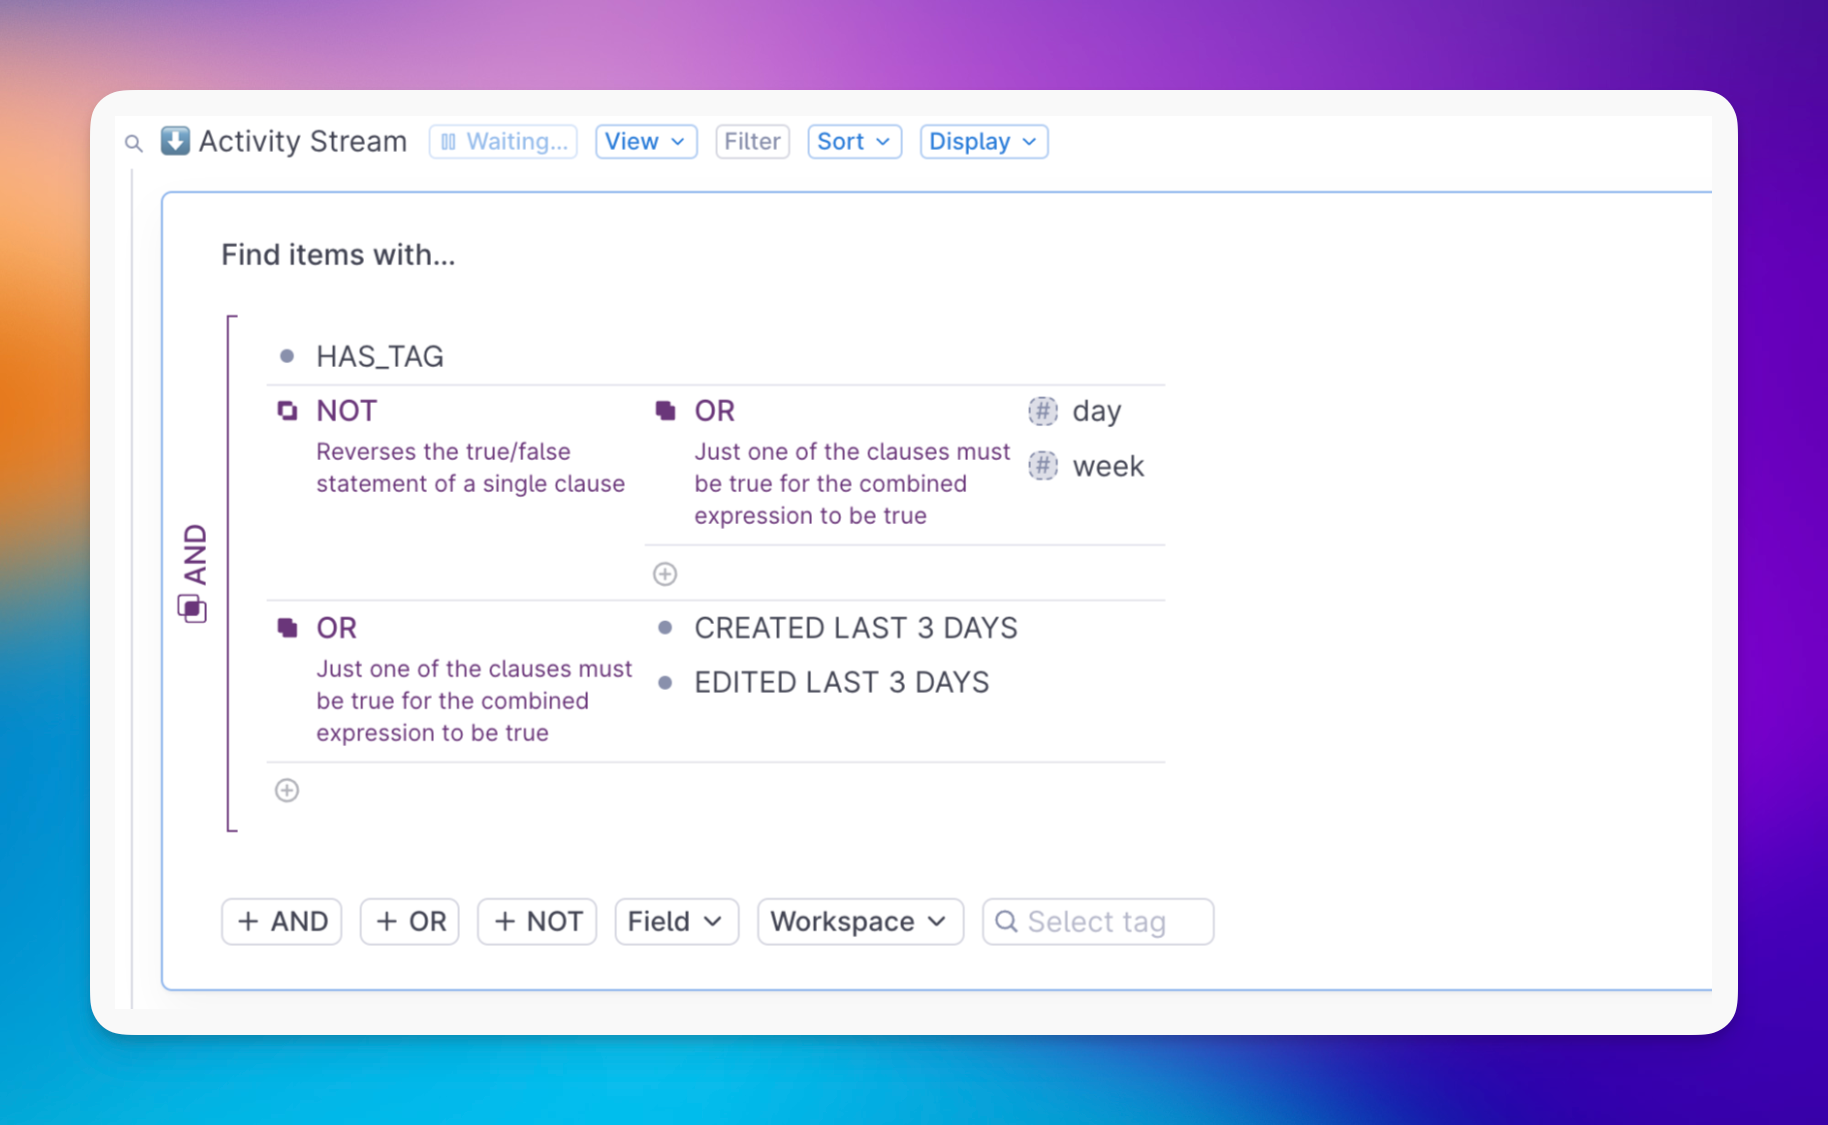
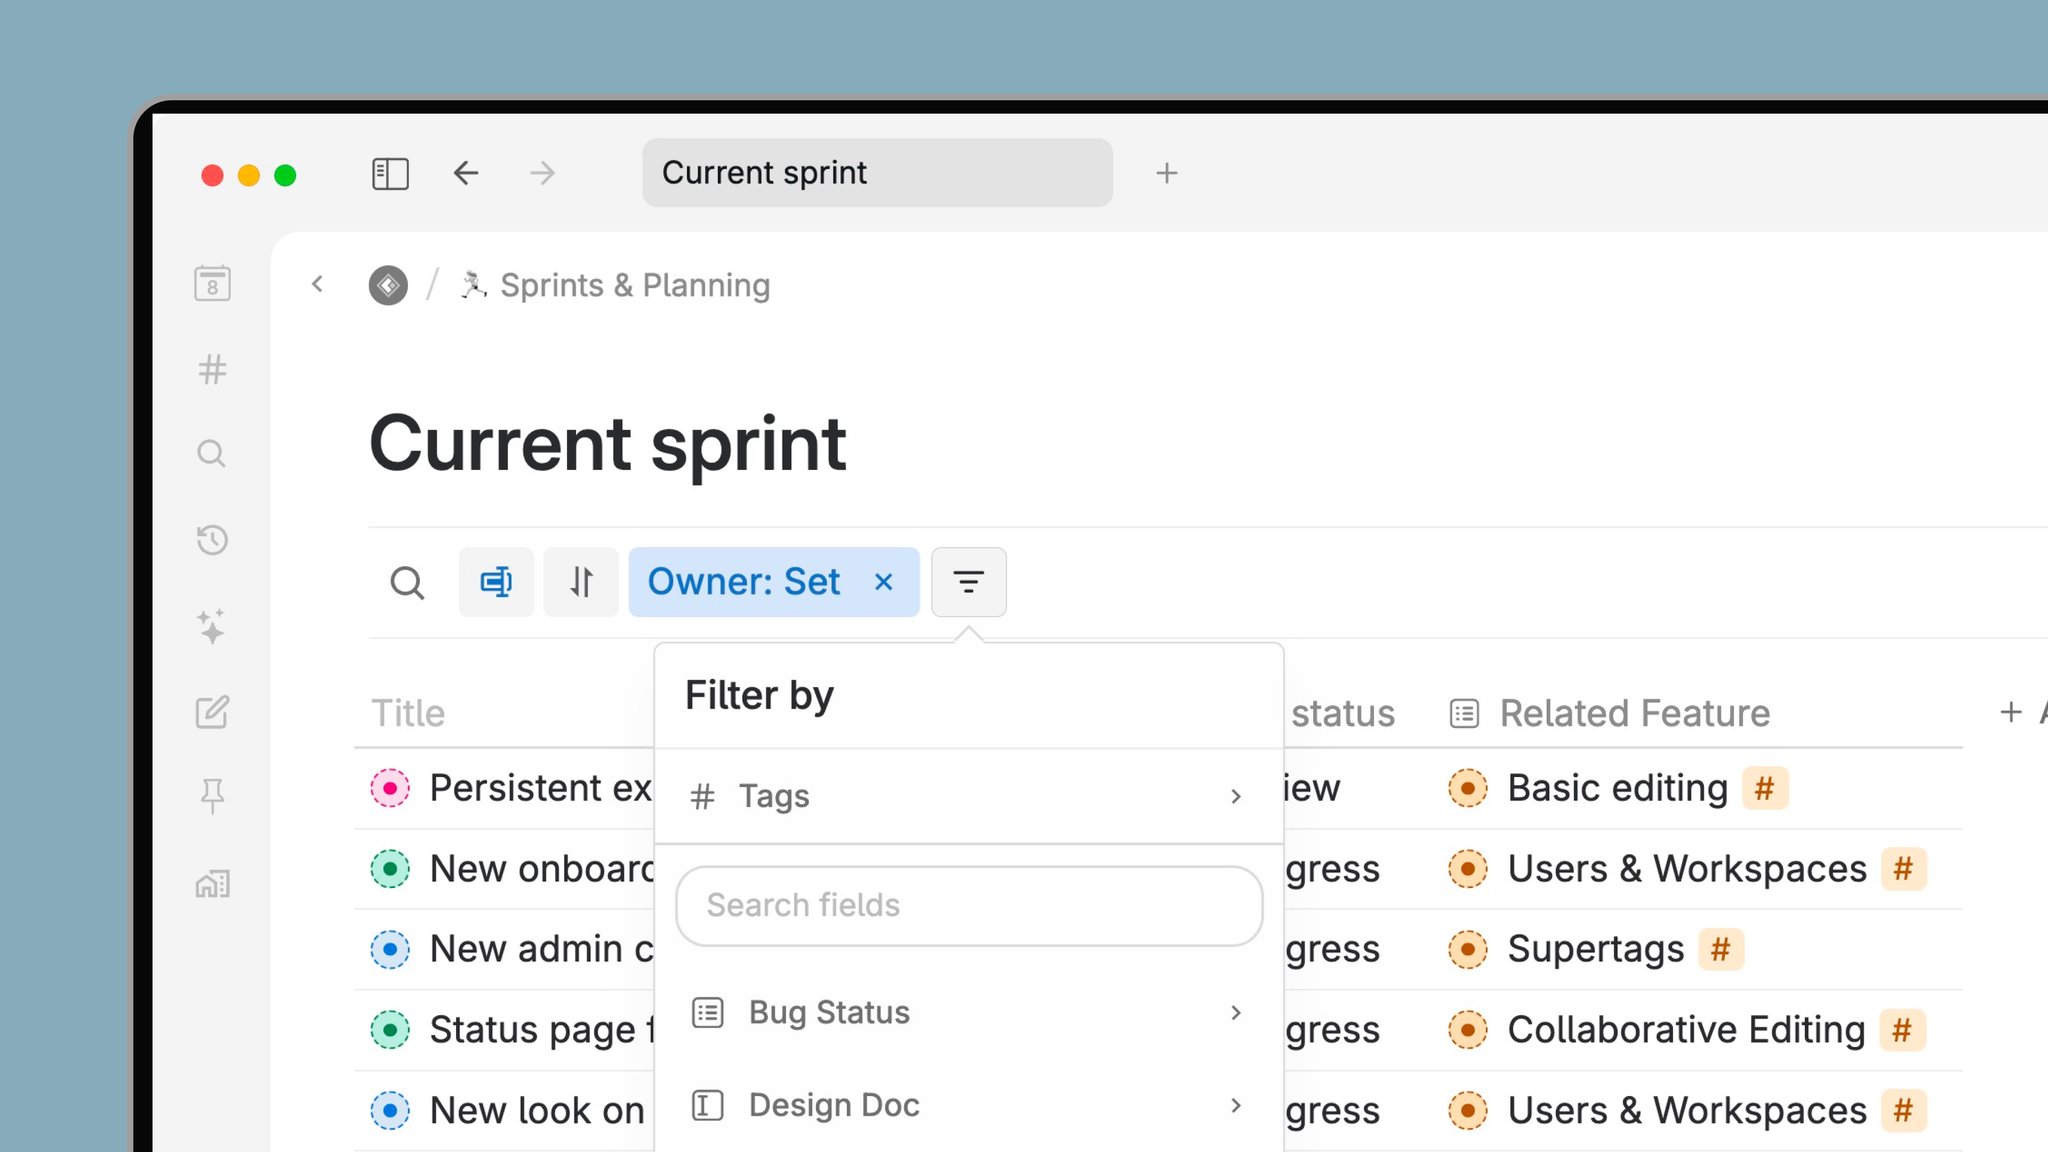
Filter by
Group by
Sort by
Display
The commands will open the menu for each option, and you can then use the keyboard to navigate to the value you want to apply with the arrow keys. To close the menu and return to the node title, press ESC.
If nodes in your view have supertags with pinned fields configured, those fields will appear at the top of these menus for quick access. See Fields for more.
Click on a field to open a dropdown and select filter values
Active options are highlighted in blue and show the selected value
Active filters show as blue pills in the toolbar, click it to configure, or click the X to remove it
Available for Outline, Table, Cards and List view.
Lets you to sort child nodes based on any user-defined field or system field, in ascending or descending order.
Press the +add sort button to further apply sort criteria. Tana prioritizes sort requirements from the top going down the list.
Remove sort settings by pressing the minus button to the right of each sort.
Sorts will always reapply when navigating away from and back to a node. If you stay on the node and make changes to sort it may require you to hit the Reapply sort button to see changes.
Page size: Adjust how many results to display before entering pagination. Default is 100.
Any collection of child nodes have a limit of displaying 100 nodes before it turns on pagination. This is on by default to ensure speed and performance. You can adjust the number if needed, though this might affect performance. Set page size through:
Cmd/Ctrl+K -> Set page size to [number]
Cmd/Ctrl+K -> Configure node, then enter the number in the Page Size field.
Result limit: Adjust how many results you want the node to return. Max is 2500 results.
Result limit is a filter that can be applied to limit the number of results a live search should return. The max and default number of results is 2500 nodes, but this can be adjusted with Result limits to return a smaller amount of nodes. Set result limit through:
Cmd/Ctrl+K -> Set result limit -> [number]
Clear result limit with: Cmd/Ctrl+K -> Clear result limit or X out the filter pill.
If you're in a Workspace with two or more members, you have the option to save default view settings that all will see as default.
If any changes are made to the default setting by any member, they will see the green button to "Save for everyone", which will change the default saved view for everyone.
You can change the view as much as you want without clicking on the "save for everyone" button, and Tana will remember your personal settings for next time.
Tana shows content using different width settings based on the active view. You can override these per node or set a default for your entire workspace.
Access: Click the width button at the top of any panel, or use Ctrl/Cmd+K > "Set content width"
Options:
Auto (default): Medium for outline and list views, Full for table, cards, calendar, side menu and tabs views
Medium: Focused writing with generous margins
Full: Maximum width, filling the view
Set workspace default: Shift+click any width option to make it your default across Tana. Or use Ctrl/Cmd+K > "Set content width default to [option]". Per-node overrides of the workspace default persist.
Your default applies to your view only, so collaborators can set their own.
FixedFixed issue where you could not right click to copy nodes in calendar view. ()
ImprovedImproved panel closing - you can now close navigation list views independently from the content views by just clicking the "x" on the panel. The other panels will stay open. ()
FixedFixed field selection popover in view options to stay within viewport boundaries. Now properly fits on screen even with many custom fields. ()
FixedAdjusted navigation view panel header sizing to better match detail heading sizes for visual consistency. ()
FixedFixed node opening in several panels when opening List navigation views in new panels from sidebar. ()
FixedAdded missing 'Close navigation view' option to context menu on right-click in list navigation views. ()
FixedImproved text wrapping for titles in navigation panel headers to prevent overflow and ensure full titles are visible. ()
ImprovedAdded workspace default for content width. Shift+click a width option to set your default for all new nodes. Access via width button or command line with 'Set content width default'. New nodes will use your default width automatically. Per-node overrides still work. ()
NewList navigation view! Links two panels side-by-side: a list panel and a detail panel. When you click an item in the list (like a task, project, or note), its full content opens in the detail panel automatically. The list stays visible on one side while you view and edit details on the other. ()
InfoFollowing the release of the new navigation view "List", the classic list view will be renamed to "Outline". ()
There is a command called Set view definition. It can set the Group, Sort and Display settings of a node view.
There is no good UX for this at the moment, so the instructions are not conventional nor friendly for beginners. But right now, this is one way of doing it:
Mock up a node that will have sample child nodes representing the data you'll be applying this command on
Then, create the exact view settings you want with Group, Sort and Display.
Go Cmd/Ctrl+K > Debug Node on the parent node and look at Views for node:
Clone the fields over to the command node so it looks like this:
When you run this command on a node, this should change the view settings according to your configuration.
The new view toolbar gives you instant control over how you see and organize information in Tana. Filter, sort, group and change display with a single click or keystroke, so you can shift perspectives quickly and stay focused on the work that matters.